Live migration
Migrate your entire database to Tiger Cloud with low downtime
Live migration is an end-to-end solution that copies the database schema and data to your target Tiger Cloud service, then replicates the database activity in your source database to the target service in real time. Live migration uses the PostgreSQL logical decoding functionality and leverages pgcopydb.
You use the live migration Docker image to move 100GB-10TB+ of data to a Tiger Cloud service seamlessly with only a few minutes downtime.
If you want to migrate more than 400GB of data, create a Tiger Console support request, or send us an email at support@tigerdata.com saying how much data you want to migrate. We pre-provision your Tiger Cloud service for you.
Best practice is to use live migration when:
- Modifying your application logic to perform dual writes is a significant effort.
- The insert workload does not exceed 20,000 rows per second, and inserts are batched.
- Your source database:
-
Uses
UPDATEandDELETEstatements on uncompressed time-series data.Live migration does not support replicating
INSERT/UPDATE/DELETEstatements on compressed data. -
Has large, busy tables with primary keys.
-
Does not have many
UPDATEorDELETEstatements.
-
This page shows you how to move your data from a self-hosted database to a Tiger Cloud service using the live-migration Docker image.
Prerequisites
Section titled “Prerequisites”Best practice is to use an Ubuntu EC2 instance hosted in the same region as your Tiger Cloud service to move data. That is, the machine you run the commands on to move your data from your source database to your target Tiger Cloud service.
Before you move your data:
-
Create a target Tiger Cloud service.
Each Tiger Cloud service has a single PostgreSQL instance that supports the most popular extensions. Tiger Cloud services do not support tablespaces, and there is no superuser associated with a service. Best practice is to create a Tiger Cloud service with at least 8 CPUs for a smoother experience. A higher-spec instance can significantly reduce the overall migration window.
-
To ensure that maintenance does not run while migration is in progress, best practice is to adjust the maintenance window.
-
Install Docker on your migration machine.
This machine needs sufficient space to store the buffered changes that occur while your data is being copied. This space is proportional to the amount of new uncompressed data being written to the Tiger Cloud service during migration. A general rule of thumb is between 100GB and 500GB. The CPU specifications of this EC2 instance should match those of your Tiger Cloud service for optimal performance. For example, if your service has an 8-CPU configuration, then your EC2 instance should also have 8 CPUs.
-
Before starting live migration, read the troubleshooting section.
Migrate to Tiger Cloud
Section titled “Migrate to Tiger Cloud”To move your data from a self-hosted database to a Tiger Cloud service:
This section shows you how to move your data from self-hosted TimescaleDB to a Tiger Cloud service using live migration from Terminal.
Set your connection strings
These variables hold the connection information for the source database and target Tiger Cloud service. In Terminal on your migration machine, set the following:
export SOURCE="postgres://<user>:<password>@<source host>:<source port>/<db_name>"export TARGET="postgres://tsdbadmin:<PASSWORD>@<HOST>:<PORT>/tsdb?sslmode=require"You find the connection information for your Tiger Cloud service in the configuration file you downloaded when you created the service.
Avoid using connection strings that route through connection poolers like PgBouncer or similar tools. This tool requires a direct connection to the database to function properly.
Align the version of TimescaleDB on the source and target
- Ensure that the source and target databases are running the same version of TimescaleDB
-
Check the version of TimescaleDB running on your Tiger Cloud service:
Terminal window psql $TARGET -c "SELECT extversion FROM pg_extension WHERE extname = 'timescaledb';" -
Update the TimescaleDB extension in your source database to match the target service:
If the TimescaleDB extension is the same version on the source database and target service, you do not need to do this.
Terminal window psql $SOURCE -c "ALTER EXTENSION timescaledb UPDATE TO '<version here>';"For more information and guidance, see Upgrade TimescaleDB.
-
- Ensure that the Tiger Cloud service is running the PostgreSQL extensions used in your source database
-
Check the extensions on the source database:
Terminal window psql $SOURCE -c "SELECT * FROM pg_extension;" -
For each extension, enable it on your target Tiger Cloud service:
Terminal window psql $TARGET -c "CREATE EXTENSION IF NOT EXISTS <extension name> CASCADE;"
-
Tune your source database
You need admin rights to to update the configuration on your source database. If you are using
a managed service, follow the instructions in the From MST tab on this page.
- Install the
wal2jsonextension on your source databaseInstall wal2json on your source database.
- Prevent PostgreSQL from treating the data in a snapshot as outdated
Terminal window psql -X -d $SOURCE -c 'alter system set old_snapshot_threshold=-1'This is not applicable if the source database is PostgreSQL 17 or later.
- Set the Write-Ahead Log (WAL) to record the information needed for logical decoding
Terminal window psql -X -d $SOURCE -c 'alter system set wal_level=logical' - Restart the source database
Your configuration changes are now active. However, verify that the settings are live in your database.
- Enable live-migration to replicate
DELETEandUPDATEoperationsReplica identity assists data replication by identifying the rows being modified. Your options are that each table and hypertable in the source database should either have:
- A primary key: data replication defaults to the primary key of the table being replicated. Nothing to do.
- A viable unique index: each table has a unique, non-partial, non-deferrable index that includes only columns marked as
NOT NULL. If a UNIQUE index does not exist, create one to assist the migration. You can delete it after migration. For each table, setREPLICA IDENTITYto the viable unique index:psql -X -d $SOURCE -c ‘ALTER TABLE <table name> REPLICA IDENTITY USING INDEX <_index_name>‘ - No primary key or viable unique index: use brute force. For each table, set
REPLICA IDENTITYtoFULL:
For eachpsql -X -d $SOURCE -c ‘ALTER TABLE <table_name> REPLICA IDENTITY FULL’UPDATEorDELETEstatement, PostgreSQL reads the whole table to find all matching rows. This results in significantly slower replication. If you are expecting a large number ofUPDATEorDELETEoperations on the table, best practice is to not useFULL.
Migrate your data, then start downtime
- Pull the live-migration Docker image to your migration machine
Terminal window sudo docker pull timescale/live-migration:latestTo list the available commands, run:
Terminal window sudo docker run --rm -it -e PGCOPYDB_SOURCE_PGURI=$SOURCE timescale/live-migration:latest --helpTo see the available flags for each command, run
--helpfor that command. For example:Terminal window sudo docker run --rm -it -e PGCOPYDB_SOURCE_PGURI=$SOURCE timescale/live-migration:latest migrate --help - Create a snapshot image of your source database in your Tiger Cloud service
This process checks that you have tuned your source database and target service correctly for replication, then creates a snapshot of your data on the migration machine:
Terminal window docker run --rm -it --name live-migration-snapshot \-e PGCOPYDB_SOURCE_PGURI=$SOURCE \-e PGCOPYDB_TARGET_PGURI=$TARGET \--pid=host \-v ~/live-migration:/opt/timescale/ts_cdc \timescale/live-migration:latest snapshotLive-migration supplies information about updates you need to make to the source database and target service. For example:
Terminal window 2024-03-25T12:40:40.884 WARNING: The following tables in the Source DB have neither a primary key nor a REPLICA IDENTITY (FULL/INDEX)2024-03-25T12:40:40.884 WARNING: UPDATE and DELETE statements on these tables will not be replicated to the Target DB2024-03-25T12:40:40.884 WARNING: - public.metricsIf you have warnings, stop live-migration, make the suggested changes and start again.
- Synchronize data between your source database and your Tiger Cloud service
This command migrates data from the snapshot to your Tiger Cloud service, then streams transactions from the source to the target.
Terminal window docker run --rm -it --name live-migration-migrate \-e PGCOPYDB_SOURCE_PGURI=$SOURCE \-e PGCOPYDB_TARGET_PGURI=$TARGET \--pid=host \-v ~/live-migration:/opt/timescale/ts_cdc \timescale/live-migration:latest migrateTipsIf the source PostgreSQL version is 17 or later, you need to pass additional flag
-e PGVERSION=17to themigratecommand.During this process, you see the migration process:
Terminal window Live-replay will complete in 1 minute 38.631 seconds (source_wal_rate: 106.0B/s, target_replay_rate: 589.0KiB/s, replay_lag: 56MiB)If
migratestops add--resumeto start from where it left off.Once the data in your target Tiger Cloud service has almost caught up with the source database, you see the following message:
Terminal window Target has caught up with source (source_wal_rate: 751.0B/s, target_replay_rate: 0B/s, replay_lag: 7KiB)To stop replication, hit 'c' and then ENTERWait until
replay_lagis down to a few kilobytes before you move to the next step. Otherwise, data replication may not have finished. - Start app downtime
-
Stop your app writing to the source database, then let the remaining transactions finish to fully sync with the target. You can use tools like the
pg_topCLI orpg_stat_activityto view the current transaction on the source database. -
Stop Live-migration.
Terminal window hit 'c' and then ENTERLive-migration continues the remaining work. This includes copying TimescaleDB metadata, sequences, and run policies. When the migration completes, you see the following message:
Terminal window Migration successfully completed
-
Validate your data, then restart your app
- Validate the migrated data
The contents of both databases should be the same. To check this you could compare the number of rows, or an aggregate of columns. However, the best validation method depends on your app.
- Stop app downtime
Once you are confident that your data is successfully replicated, configure your apps to use your Tiger Cloud service.
- Cleanup resources associated with live-migration from your migration machine
This command removes all resources and temporary files used in the migration process. When you run this command, you can no longer resume live-migration.
Terminal window docker run --rm -it --name live-migration-clean \-e PGCOPYDB_SOURCE_PGURI=$SOURCE \-e PGCOPYDB_TARGET_PGURI=$TARGET \--pid=host \-v ~/live-migration:/opt/timescale/ts_cdc \timescale/live-migration:latest clean --prune
This section shows you how to move your data from self-hosted PostgreSQL to a Tiger Cloud service using live migration from Terminal.
Set your connection strings
These variables hold the connection information for the source database and target Tiger Cloud service. In Terminal on your migration machine, set the following:
export SOURCE="postgres://<user>:<password>@<source host>:<source port>/<db_name>"export TARGET="postgres://tsdbadmin:<PASSWORD>@<HOST>:<PORT>/tsdb?sslmode=require"You find the connection information for your Tiger Cloud service in the configuration file you downloaded when you created the service.
Avoid using connection strings that route through connection poolers like PgBouncer or similar tools. This tool requires a direct connection to the database to function properly.
Align the extensions on the source and target
- Ensure that the Tiger Cloud service is running the PostgreSQL extensions used in your source database
-
Check the extensions on the source database:
Terminal window psql $SOURCE -c "SELECT * FROM pg_extension;" -
For each extension, enable it on your target Tiger Cloud service:
Terminal window psql $TARGET -c "CREATE EXTENSION IF NOT EXISTS <extension name> CASCADE;"
-
Tune your source database
You need admin rights to to update the configuration on your source database. If you are using
a managed service, follow the instructions in the From AWS RDS/Aurora tab on this page.
- Install the
wal2jsonextension on your source databaseInstall wal2json on your source database.
- Prevent PostgreSQL from treating the data in a snapshot as outdated
Terminal window psql -X -d $SOURCE -c 'alter system set old_snapshot_threshold=-1'This is not applicable if the source database is PostgreSQL 17 or later.
- Set the Write-Ahead Log (WAL) to record the information needed for logical decoding
Terminal window psql -X -d $SOURCE -c 'alter system set wal_level=logical' - Restart the source database
Your configuration changes are now active. However, verify that the settings are live in your database.
- Enable live-migration to replicate
DELETEandUPDATEoperationsReplica identity assists data replication by identifying the rows being modified. Your options are that each table and hypertable in the source database should either have:
- A primary key: data replication defaults to the primary key of the table being replicated. Nothing to do.
- A viable unique index: each table has a unique, non-partial, non-deferrable index that includes only columns marked as
NOT NULL. If a UNIQUE index does not exist, create one to assist the migration. You can delete it after migration. For each table, setREPLICA IDENTITYto the viable unique index:psql -X -d $SOURCE -c ‘ALTER TABLE <table name> REPLICA IDENTITY USING INDEX <_index_name>‘ - No primary key or viable unique index: use brute force. For each table, set
REPLICA IDENTITYtoFULL:
For eachpsql -X -d $SOURCE -c ‘ALTER TABLE <table_name> REPLICA IDENTITY FULL’UPDATEorDELETEstatement, PostgreSQL reads the whole table to find all matching rows. This results in significantly slower replication. If you are expecting a large number ofUPDATEorDELETEoperations on the table, best practice is to not useFULL.
Migrate your data, then start downtime
- Pull the live-migration Docker image to your migration machine
Terminal window sudo docker pull timescale/live-migration:latestTo list the available commands, run:
Terminal window sudo docker run --rm -it -e PGCOPYDB_SOURCE_PGURI=$SOURCE timescale/live-migration:latest --helpTo see the available flags for each command, run
--helpfor that command. For example:Terminal window sudo docker run --rm -it -e PGCOPYDB_SOURCE_PGURI=$SOURCE timescale/live-migration:latest migrate --help - Create a snapshot image of your source database in your Tiger Cloud service
This process checks that you have tuned your source database and target service correctly for replication, then creates a snapshot of your data on the migration machine:
Terminal window docker run --rm -it --name live-migration-snapshot \-e PGCOPYDB_SOURCE_PGURI=$SOURCE \-e PGCOPYDB_TARGET_PGURI=$TARGET \--pid=host \-v ~/live-migration:/opt/timescale/ts_cdc \timescale/live-migration:latest snapshotLive-migration supplies information about updates you need to make to the source database and target service. For example:
Terminal window 2024-03-25T12:40:40.884 WARNING: The following tables in the Source DB have neither a primary key nor a REPLICA IDENTITY (FULL/INDEX)2024-03-25T12:40:40.884 WARNING: UPDATE and DELETE statements on these tables will not be replicated to the Target DB2024-03-25T12:40:40.884 WARNING: - public.metricsIf you have warnings, stop live-migration, make the suggested changes and start again.
- Synchronize data between your source database and your Tiger Cloud service
This command migrates data from the snapshot to your Tiger Cloud service, then streams transactions from the source to the target.
Terminal window docker run --rm -it --name live-migration-migrate \-e PGCOPYDB_SOURCE_PGURI=$SOURCE \-e PGCOPYDB_TARGET_PGURI=$TARGET \--pid=host \-v ~/live-migration:/opt/timescale/ts_cdc \timescale/live-migration:latest migrateTipsIf the source PostgreSQL version is 17 or later, you need to pass additional flag
-e PGVERSION=17to themigratecommand.After migrating the schema, live-migration prompts you to create hypertables for tables that contain time-series data in your Tiger Cloud service. Run
create_hypertable()to convert these tables. For more information, see the hypertable docs.During this process, you see the migration process:
Terminal window Live-replay will complete in 1 minute 38.631 seconds (source_wal_rate: 106.0B/s, target_replay_rate: 589.0KiB/s, replay_lag: 56MiB)If
migratestops add--resumeto start from where it left off.Once the data in your target Tiger Cloud service has almost caught up with the source database, you see the following message:
Terminal window Target has caught up with source (source_wal_rate: 751.0B/s, target_replay_rate: 0B/s, replay_lag: 7KiB)To stop replication, hit 'c' and then ENTERWait until
replay_lagis down to a few kilobytes before you move to the next step. Otherwise, data replication may not have finished. - Start app downtime
-
Stop your app writing to the source database, then let the remaining transactions finish to fully sync with the target. You can use tools like the
pg_topCLI orpg_stat_activityto view the current transaction on the source database. -
Stop Live-migration.
Terminal window hit 'c' and then ENTERLive-migration continues the remaining work. This includes copying TimescaleDB metadata, sequences, and run policies. When the migration completes, you see the following message:
Terminal window Migration successfully completed
-
Validate your data, then restart your app
- Validate the migrated data
The contents of both databases should be the same. To check this you could compare the number of rows, or an aggregate of columns. However, the best validation method depends on your app.
- Stop app downtime
Once you are confident that your data is successfully replicated, configure your apps to use your Tiger Cloud service.
- Cleanup resources associated with live-migration from your migration machine
This command removes all resources and temporary files used in the migration process. When you run this command, you can no longer resume live-migration.
Terminal window docker run --rm -it --name live-migration-clean \-e PGCOPYDB_SOURCE_PGURI=$SOURCE \-e PGCOPYDB_TARGET_PGURI=$TARGET \--pid=host \-v ~/live-migration:/opt/timescale/ts_cdc \timescale/live-migration:latest clean --prune
To migrate your data from an Amazon RDS/Aurora PostgreSQL instance to a Tiger Cloud service, you extract the data to an intermediary EC2 Ubuntu instance in the same AWS region as your RDS/Aurora instance. You then upload your data to a Tiger Cloud service. To make this process as painless as possible, ensure that the intermediary machine has enough CPU and disk space to rapidly extract and store your data before uploading to Tiger Cloud.
Migration from RDS/Aurora gives you the opportunity to create hypertables before copying the data. Once the migration is complete, you can manually enable Tiger Cloud features like data compression or data retention.
This section shows you how to move your data from an Amazon RDS/Aurora instance to a Tiger Cloud service using live migration.
Create an intermediary EC2 Ubuntu instance
- Select the RDS/Aurora instance to migrate
In https://console.aws.amazon.com/rds/home#databases:, select the RDS/Aurora PostgreSQL instance to migrate.
- Click
Actions>Set up EC2 connectionPress
Create EC2 instanceand use the following settings:- AMI: Ubuntu Server.
- Key pair: use an existing pair or create a new one that you will use to access the intermediary machine.
- VPC: by default, this is the same as the database instance.
- Configure Storage: adjust the volume to at least the size of RDS/Aurora PostgreSQL instance you are migrating from. You can reduce the space used by your data on Tiger Cloud using Hypercore.
- Click
Launch instance, then connect via SSHAWS creates your EC2 instance. Click
Connect to instance>SSH clientand follow the instructions to create the connection to your intermediary EC2 instance.
Install the psql client tools on the intermediary instance
- Connect to your intermediary EC2 instance. For example:
Terminal window ssh -i "<key-pair>.pem" ubuntu@<EC2 instance's Public IPv4> - On your intermediary EC2 instance, install the PostgreSQL client.
Terminal window sudo sh -c 'echo "deb http://apt.postgresql.org/pub/repos/apt $(lsb_release -cs)-pgdg main" > /etc/apt/sources.list.d/pgdg.list'wget -qO- https://www.postgresql.org/media/keys/ACCC4CF8.asc | sudo tee /etc/apt/trusted.gpg.d/pgdg.asc &>/dev/nullsudo apt updatesudo apt install postgresql-client-16 -y # "postgresql-client-16" if your source DB is using PG 16.psql --version && pg_dump --versionKeep this terminal open, you need it to connect to the RDS/Aurora PostgreSQL instance for migration.
Set up secure connectivity between your RDS/Aurora PostgreSQL and EC2 instances
- Select the RDS/Aurora instance to migrate
In https://console.aws.amazon.com/rds/home#databases:, select the RDS/Aurora PostgreSQL instance to migrate.
- Open the inbound rules for the security group
Scroll down to
Security group rules (1)and select theEC2 Security Group - Inboundgroup. TheSecurity Groups (1)window opens. Click theSecurity group ID, then clickEdit inbound rules.
- On your intermediary EC2 instance, get your local IP address:
Terminal window ec2metadata --local-ipv4Bear with me on this one, you need this IP address to enable access to your RDS/Aurora PostgreSQL instance.
- Add inbound rule for your EC2 instance
In
Edit inbound rules, clickAdd rule, then create a PostgreSQLTCPrule granting access to the local IP address for your EC2 instance. Then clickSave rules.
Test the connection between your RDS/Aurora PostgreSQL and EC2 instances
- Select the RDS/Aurora instance to migrate
In https://console.aws.amazon.com/rds/home#databases:, select the RDS/Aurora PostgreSQL instance to migrate.
- Create the source connection string
On your intermediary EC2 instance, use the values of
Endpoint,Port,Master username, andDB nameto create the PostgreSQL connectivity string for theSOURCEvariable.
Terminal window export SOURCE="postgres://<Master username>:<Master password>@<Endpoint>:<Port>/<DB name>"The value of
Master passwordwas supplied when this RDS/Aurora PostgreSQL instance was created. - Test your connection:
Terminal window psql -d $SOURCEYou are connected to your RDS/Aurora PostgreSQL instance from your intermediary EC2 instance.
Set your connection strings
These variables hold the connection information for the source database and target Tiger Cloud service. In Terminal on your migration machine, set the following:
export SOURCE="postgres://<user>:<password>@<source host>:<source port>/<db_name>"export TARGET="postgres://tsdbadmin:<PASSWORD>@<HOST>:<PORT>/tsdb?sslmode=require"You find the connection information for your Tiger Cloud service in the configuration file you downloaded when you created the service.
Avoid using connection strings that route through connection poolers like PgBouncer or similar tools. This tool requires a direct connection to the database to function properly.
Align the extensions on the source and target
- Ensure that the Tiger Cloud service is running the PostgreSQL extensions used in your source database
-
Check the extensions on the source database:
Terminal window psql $SOURCE -c "SELECT * FROM pg_extension;" -
For each extension, enable it on your target Tiger Cloud service:
Terminal window psql $TARGET -c "CREATE EXTENSION IF NOT EXISTS <extension name> CASCADE;"
-
Tune your source database
Updating parameters on a PostgreSQL instance will cause an outage. Choose a time that will cause the least issues to tune this database.
- Update the DB instance parameter group for your source database
-
In https://console.aws.amazon.com/rds/home#databases:, select the RDS instance to migrate.
-
Click
Configuration, scroll down and note theDB instance parameter group, then clickParameter groups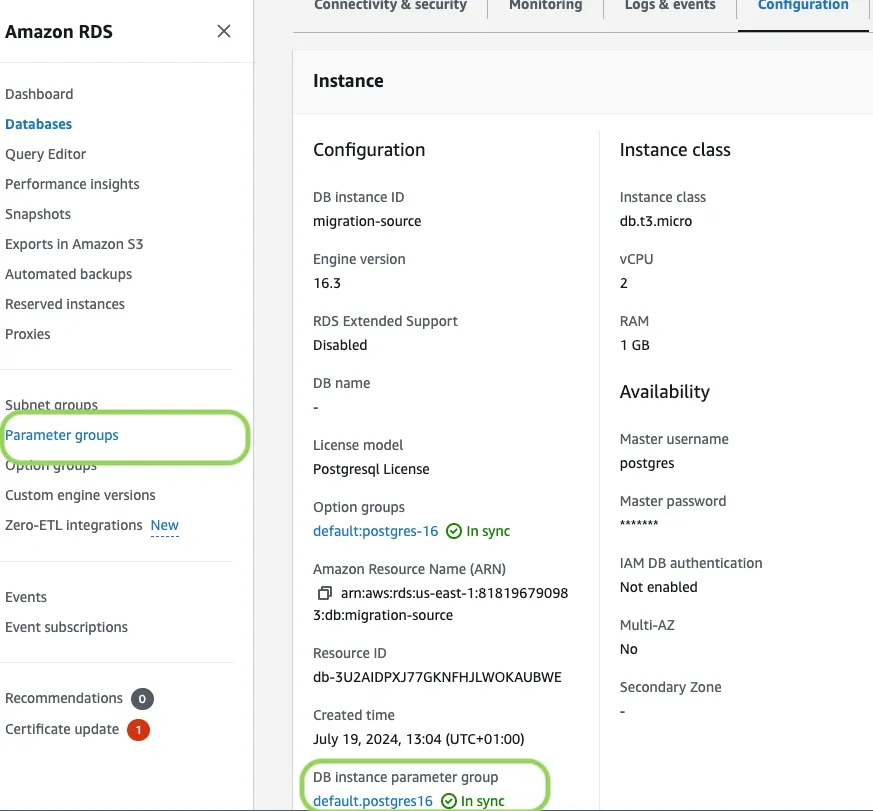
-
Click
Create parameter group, fill in the form with the following values, then clickCreate.- Parameter group name - whatever suits your fancy.
- Description - knock yourself out with this one.
- Engine type -
{C.PG} - Parameter group family - the same as
DB instance parameter groupin yourConfiguration.
-
In
Parameter groups, select the parameter group you created, then clickEdit. -
Update the following parameters, then click
Save changes.rds.logical_replicationset to1: record the information needed for logical decoding.wal_sender_timeoutset to0: disable the timeout for the sender process.
-
In RDS, navigate back to your databases, select the RDS instance to migrate, and click
Modify. -
Scroll down to
Database options, select your new parameter group, and clickContinue. -
Click
Apply immediatelyor choose a maintenance window, then clickModify DB instance.Changing parameters will cause an outage. Wait for the database instance to reboot before continuing.
-
Verify that the settings are live in your database.
-
- Enable replication
DELETEandUPDATEoperationsReplica identity assists data replication by identifying the rows being modified. Your options are that each table and hypertable in the source database should either have:
- A primary key: data replication defaults to the primary key of the table being replicated. Nothing to do.
- A viable unique index: each table has a unique, non-partial, non-deferrable index that includes only columns marked as
NOT NULL. If a UNIQUE index does not exist, create one to assist the migration. You can delete it after migration. For each table, setREPLICA IDENTITYto the viable unique index:psql -X -d $SOURCE -c ‘ALTER TABLE <table name> REPLICA IDENTITY USING INDEX <_index_name>‘ - No primary key or viable unique index: use brute force. For each table, set
REPLICA IDENTITYtoFULL:
For eachpsql -X -d $SOURCE -c ‘ALTER TABLE <table_name> REPLICA IDENTITY FULL’UPDATEorDELETEstatement, PostgreSQL reads the whole table to find all matching rows. This results in significantly slower replication. If you are expecting a large number ofUPDATEorDELETEoperations on the table, best practice is to not useFULL.
Migrate your data, then start downtime
- Pull the live-migration Docker image to your migration machine
Terminal window sudo docker pull timescale/live-migration:latestTo list the available commands, run:
Terminal window sudo docker run --rm -it -e PGCOPYDB_SOURCE_PGURI=$SOURCE timescale/live-migration:latest --helpTo see the available flags for each command, run
--helpfor that command. For example:Terminal window sudo docker run --rm -it -e PGCOPYDB_SOURCE_PGURI=$SOURCE timescale/live-migration:latest migrate --help - Create a snapshot image of your source database in your Tiger Cloud service
This process checks that you have tuned your source database and target service correctly for replication, then creates a snapshot of your data on the migration machine:
Terminal window docker run --rm -it --name live-migration-snapshot \-e PGCOPYDB_SOURCE_PGURI=$SOURCE \-e PGCOPYDB_TARGET_PGURI=$TARGET \--pid=host \-v ~/live-migration:/opt/timescale/ts_cdc \timescale/live-migration:latest snapshotLive-migration supplies information about updates you need to make to the source database and target service. For example:
Terminal window 2024-03-25T12:40:40.884 WARNING: The following tables in the Source DB have neither a primary key nor a REPLICA IDENTITY (FULL/INDEX)2024-03-25T12:40:40.884 WARNING: UPDATE and DELETE statements on these tables will not be replicated to the Target DB2024-03-25T12:40:40.884 WARNING: - public.metricsIf you have warnings, stop live-migration, make the suggested changes and start again.
- Synchronize data between your source database and your Tiger Cloud service
This command migrates data from the snapshot to your Tiger Cloud service, then streams transactions from the source to the target.
Terminal window docker run --rm -it --name live-migration-migrate \-e PGCOPYDB_SOURCE_PGURI=$SOURCE \-e PGCOPYDB_TARGET_PGURI=$TARGET \--pid=host \-v ~/live-migration:/opt/timescale/ts_cdc \timescale/live-migration:latest migrateTipsIf the source PostgreSQL version is 17 or later, you need to pass additional flag
-e PGVERSION=17to themigratecommand.After migrating the schema, live-migration prompts you to create hypertables for tables that contain time-series data in your Tiger Cloud service. Run
create_hypertable()to convert these tables. For more information, see the hypertable docs.During this process, you see the migration process:
Terminal window Live-replay will complete in 1 minute 38.631 seconds (source_wal_rate: 106.0B/s, target_replay_rate: 589.0KiB/s, replay_lag: 56MiB)If
migratestops add--resumeto start from where it left off.Once the data in your target Tiger Cloud service has almost caught up with the source database, you see the following message:
Terminal window Target has caught up with source (source_wal_rate: 751.0B/s, target_replay_rate: 0B/s, replay_lag: 7KiB)To stop replication, hit 'c' and then ENTERWait until
replay_lagis down to a few kilobytes before you move to the next step. Otherwise, data replication may not have finished. - Start app downtime
-
Stop your app writing to the source database, then let the remaining transactions finish to fully sync with the target. You can use tools like the
pg_topCLI orpg_stat_activityto view the current transaction on the source database. -
Stop Live-migration.
Terminal window hit 'c' and then ENTERLive-migration continues the remaining work. This includes copying TimescaleDB metadata, sequences, and run policies. When the migration completes, you see the following message:
Terminal window Migration successfully completed
-
Validate your data, then restart your app
- Validate the migrated data
The contents of both databases should be the same. To check this you could compare the number of rows, or an aggregate of columns. However, the best validation method depends on your app.
- Stop app downtime
Once you are confident that your data is successfully replicated, configure your apps to use your Tiger Cloud service.
- Cleanup resources associated with live-migration from your migration machine
This command removes all resources and temporary files used in the migration process. When you run this command, you can no longer resume live-migration.
Terminal window docker run --rm -it --name live-migration-clean \-e PGCOPYDB_SOURCE_PGURI=$SOURCE \-e PGCOPYDB_TARGET_PGURI=$TARGET \--pid=host \-v ~/live-migration:/opt/timescale/ts_cdc \timescale/live-migration:latest clean --prune
This section shows you how to move your data from a MST instance to a Tiger Cloud service using live migration from Terminal.
Set your connection strings
These variables hold the connection information for the source database and target Tiger Cloud service. In Terminal on your migration machine, set the following:
export SOURCE="postgres://<user>:<password>@<source host>:<source port>/<db_name>"export TARGET="postgres://tsdbadmin:<PASSWORD>@<HOST>:<PORT>/tsdb?sslmode=require"You find the connection information for your Tiger Cloud service in the configuration file you downloaded when you created the service.
Avoid using connection strings that route through connection poolers like PgBouncer or similar tools. This tool requires a direct connection to the database to function properly.
Align the version of TimescaleDB on the source and target
- Ensure that the source and target databases are running the same version of TimescaleDB
-
Check the version of TimescaleDB running on your Tiger Cloud service:
Terminal window psql $TARGET -c "SELECT extversion FROM pg_extension WHERE extname = 'timescaledb';" -
Update the TimescaleDB extension in your source database to match the target service:
If the TimescaleDB extension is the same version on the source database and target service, you do not need to do this.
Terminal window psql $SOURCE -c "ALTER EXTENSION timescaledb UPDATE TO '<version here>';"For more information and guidance, see Upgrade TimescaleDB.
-
- Ensure that the Tiger Cloud service is running the PostgreSQL extensions used in your source database
-
Check the extensions on the source database:
Terminal window psql $SOURCE -c "SELECT * FROM pg_extension;" -
For each extension, enable it on your target Tiger Cloud service:
Terminal window psql $TARGET -c "CREATE EXTENSION IF NOT EXISTS <extension name> CASCADE;"
-
Tune your source database
- Enable live-migration to replicate
DELETEandUPDATEoperationsReplica identity assists data replication by identifying the rows being modified. Your options are that each table and hypertable in the source database should either have:
- A primary key: data replication defaults to the primary key of the table being replicated. Nothing to do.
- A viable unique index: each table has a unique, non-partial, non-deferrable index that includes only columns marked as
NOT NULL. If a UNIQUE index does not exist, create one to assist the migration. You can delete it after migration. For each table, setREPLICA IDENTITYto the viable unique index:psql -X -d $SOURCE -c ‘ALTER TABLE <table name> REPLICA IDENTITY USING INDEX <_index_name>‘ - No primary key or viable unique index: use brute force. For each table, set
REPLICA IDENTITYtoFULL:
For eachpsql -X -d $SOURCE -c ‘ALTER TABLE <table_name> REPLICA IDENTITY FULL’UPDATEorDELETEstatement, PostgreSQL reads the whole table to find all matching rows. This results in significantly slower replication. If you are expecting a large number ofUPDATEorDELETEoperations on the table, best practice is to not useFULL.
Migrate your data, then start downtime
- Pull the live-migration Docker image to your migration machine
Terminal window sudo docker pull timescale/live-migration:latestTo list the available commands, run:
Terminal window sudo docker run --rm -it -e PGCOPYDB_SOURCE_PGURI=$SOURCE timescale/live-migration:latest --helpTo see the available flags for each command, run
--helpfor that command. For example:Terminal window sudo docker run --rm -it -e PGCOPYDB_SOURCE_PGURI=$SOURCE timescale/live-migration:latest migrate --help - Create a snapshot image of your source database in your Tiger Cloud service
This process checks that you have tuned your source database and target service correctly for replication, then creates a snapshot of your data on the migration machine:
Terminal window docker run --rm -it --name live-migration-snapshot \-e PGCOPYDB_SOURCE_PGURI=$SOURCE \-e PGCOPYDB_TARGET_PGURI=$TARGET \--pid=host \-v ~/live-migration:/opt/timescale/ts_cdc \timescale/live-migration:latest snapshotLive-migration supplies information about updates you need to make to the source database and target service. For example:
Terminal window 2024-03-25T12:40:40.884 WARNING: The following tables in the Source DB have neither a primary key nor a REPLICA IDENTITY (FULL/INDEX)2024-03-25T12:40:40.884 WARNING: UPDATE and DELETE statements on these tables will not be replicated to the Target DB2024-03-25T12:40:40.884 WARNING: - public.metricsIf you have warnings, stop live-migration, make the suggested changes and start again.
- Synchronize data between your source database and your Tiger Cloud service
This command migrates data from the snapshot to your Tiger Cloud service, then streams transactions from the source to the target.
Terminal window docker run --rm -it --name live-migration-migrate \-e PGCOPYDB_SOURCE_PGURI=$SOURCE \-e PGCOPYDB_TARGET_PGURI=$TARGET \--pid=host \-v ~/live-migration:/opt/timescale/ts_cdc \timescale/live-migration:latest migrateTipsIf the source PostgreSQL version is 17 or later, you need to pass additional flag
-e PGVERSION=17to themigratecommand.During this process, you see the migration process:
Terminal window Live-replay will complete in 1 minute 38.631 seconds (source_wal_rate: 106.0B/s, target_replay_rate: 589.0KiB/s, replay_lag: 56MiB)If
migratestops add--resumeto start from where it left off.Once the data in your target Tiger Cloud service has almost caught up with the source database, you see the following message:
Terminal window Target has caught up with source (source_wal_rate: 751.0B/s, target_replay_rate: 0B/s, replay_lag: 7KiB)To stop replication, hit 'c' and then ENTERWait until
replay_lagis down to a few kilobytes before you move to the next step. Otherwise, data replication may not have finished. - Start app downtime
-
Stop your app writing to the source database, then let the remaining transactions finish to fully sync with the target. You can use tools like the
pg_topCLI orpg_stat_activityto view the current transaction on the source database. -
Stop Live-migration.
Terminal window hit 'c' and then ENTERLive-migration continues the remaining work. This includes copying TimescaleDB metadata, sequences, and run policies. When the migration completes, you see the following message:
Terminal window Migration successfully completed
-
Validate your data, then restart your app
- Validate the migrated data
The contents of both databases should be the same. To check this you could compare the number of rows, or an aggregate of columns. However, the best validation method depends on your app.
- Stop app downtime
Once you are confident that your data is successfully replicated, configure your apps to use your Tiger Cloud service.
- Cleanup resources associated with live-migration from your migration machine
This command removes all resources and temporary files used in the migration process. When you run this command, you can no longer resume live-migration.
Terminal window docker run --rm -it --name live-migration-clean \-e PGCOPYDB_SOURCE_PGURI=$SOURCE \-e PGCOPYDB_TARGET_PGURI=$TARGET \--pid=host \-v ~/live-migration:/opt/timescale/ts_cdc \timescale/live-migration:latest clean --prune
And you are done, your data is now in your Tiger Cloud service.
Troubleshooting
Section titled “Troubleshooting”This section shows you how to work around frequently seen issues when using live migration.
ERROR: relation “xxx.yy” does not exist
This may happen when a relation is removed after executing the snapshot command. A relation can be
a table, index, view, or materialized view. When you see you this error:
-
Do not perform any explicit DDL operation on the source database during the course of migration.
-
If you are migrating from self-hosted TimescaleDB or MST, disable the chunk retention policy on your source database until you have finished migration.
FATAL: remaining connection slots are reserved for non-replication superuser connections
This may happen when the number of connections exhaust max_connections defined in your target Tiger Cloud service.
By default, live-migration needs around ~6 connections on the source and ~12 connections on the target.
Migration seems to be stuck with “x GB copied to Target DB (Source DB is y GB)”
When you are migrating a lot of data involved in aggregation, or there are many materialized views taking time
to complete the materialization, this may be due to REFRESH MATERIALIZED VIEWS happening at the end of initial
data migration.
To resolve this issue:
- See what is happening on the target Tiger Cloud service
Terminal window psql $TARGET -c "select * from pg_stat_activity where application_name ilike '%pgcopydb%';" - When you run migrate, add flags to exclude specific materialized views
Terminal window --skip-table-data <matview1> <matview2>" - When
migratehas finished, manually refresh the materialized views you excluded
Restart migration from scratch after a non-resumable failure
If the migration halts due to a failure, such as a misconfiguration of the source or target database, you may need to
restart the migration from scratch. In such cases, you can reuse the original target Tiger Cloud service created for the
migration by utilizing the --drop-if-exists flag with the migrate command.
This flag ensures that the existing target objects created by the previous migration are dropped, allowing the migration to proceed without trouble.
Note: This flag also requires you to manually recreate the TimescaleDB extension on the target.
Here’s an example command sequence to restart the migration:
psql $TARGET -c "DROP EXTENSION timescaledb CASCADE"
psql $TARGET -c 'CREATE EXTENSION timescaledb VERSION "<desired version>"'
docker run --rm -it --name live-migration-migrate \    -e PGCOPYDB_SOURCE_PGURI=$SOURCE \    -e PGCOPYDB_TARGET_PGURI=$TARGET \    --pid=host \    -v ~/live-migration:/opt/timescale/ts_cdc \    timescale/live-migration:latest migrate --drop-if-exists
This approach provides a clean slate for the migration process while reusing the existing target instance.
Inactive or lagging replication slots
If you encounter an “Inactive or lagging replication slots” warning on your cloud provider console after using live-migration, it might be due to lingering replication slots created by the live-migration tool on your source database.
To clean up resources associated with live migration, use the following command:
docker run --rm -it --name live-migration-clean \ -e PGCOPYDB_SOURCE_PGURI=$SOURCE \ -e PGCOPYDB_TARGET_PGURI=$TARGET \ --pid=host \ -v ~/live-migration:/opt/timescale/ts_cdc \ timescale/live-migration:latest clean --pruneThe --prune flag is used to delete temporary files in the ~/live-migration directory
that were needed for the migration process. It’s important to note that executing the
clean command means you cannot resume the interrupted live migration.
Role passwords
Because of issues dumping passwords from various managed service providers, Live-migration migrates roles without passwords. You have to migrate passwords manually.
Table privileges
Live-migration does not migrate table privileges. After completing Live-migration:
- Grant all roles to
tsdbadminTerminal window psql -d $SOURCE -t -A -c "SELECT FORMAT('GRANT %I TO tsdbadmin;', rolname) FROMpg_catalog.pg_roles WHERE rolname not like 'pg_%' AND rolname != 'tsdbadmin'AND NOT rolsuper" | psql -d $TARGET -f - - On your migration machine, edit
/tmp/grants.psqlto match table privileges on your source databaseTerminal window pg_dump --schema-only --quote-all-identifiers--exclude-schema=_timescaledb_catalog --format=plain --dbname "$SOURCE" | grep"(ALTER.*OWNER.*|GRANT|REVOKE)" > /tmp/grants.psql - Run
grants.psqlon your target Tiger Cloud serviceTerminal window psql -d $TARGET -f /tmp/grants.psql
PostgreSQL to Tiger Cloud: “live-replay not keeping up with source load”
- Find the slow query
Go to Tiger Console ->
Monitoring->Insightstab and find the query which takes significant time. - Check indexes for UPDATE/DELETE queries
If the query is either UPDATE/DELETE, make sure the columns used on the WHERE clause have necessary indexes.
- Check REPLICA IDENTITY for hypertables
If the query is either UPDATE/DELETE on the tables which are converted as hypertables, make sure the REPLICA IDENTITY (defaults to primary key) on the source is compatible with the target primary key. If not, create a UNIQUE index on the source database by including the hypertable partition column and make it a REPLICA IDENTITY. Also, create the same UNIQUE index on the target.
ERROR: out of memory (or) Failed on request of size xxx in memory context “yyy” on a Tiger Cloud service
This error occurs when the Out of Memory (OOM) guard is triggered due to memory allocations exceeding safe limits. It typically happens when multiple concurrent connections to the TimescaleDB instance are performing memory-intensive operations. For example, during live migrations, this error can occur when large indexes are being created simultaneously.
The live-migration tool includes a retry mechanism to handle such errors. However, frequent OOM crashes may significantly delay the migration process.
One of the following can be used to avoid the OOM errors:
- Upgrade to higher memory spec instances
To mitigate memory constraints, consider using a TimescaleDB instance with higher specifications, such as an instance with 8 CPUs and 32 GB RAM (or more). Higher memory capacity can handle larger workloads and reduce the likelihood of OOM errors.
- Reduce concurrency
If upgrading your instance is not feasible, you can reduce the concurrency of the index migration process using the
--index-jobs=<value>flag in the migration command. By default, the value of--index-jobsmatches the GUC max_parallel_workers. Lowering this value reduces the memory usage during migration but may increase the total migration time.